The Asphalt Shingle Roof Installation Process Explained Step by Step
People searching for asphalt shingle roof installation are typically looking to have their roof properly installed or replaced, and local contractors can expertly handle each step of the process to ensure quality results.
Understanding the asphalt shingle roof installation process explained step by step can provide property owners with valuable insight into what to expect when upgrading or replacing their roof. Whether planning a new installation or considering repairs, knowing the general stages helps homeowners make informed decisions and ensures they choose experienced local contractors who can handle each part of the project efficiently. This knowledge is especially useful for those in the area who want to protect their property, improve curb appeal, or prevent future issues caused by aging or damaged roofing materials.
Asphalt shingle roof installation services offered by local contractors are designed to guide property owners through each phase of the process, from initial preparation to final inspection. Exploring this topic can help homeowners identify quality workmanship and understand the importance of proper installation techniques. Keeping informed about the steps involved can also make it easier to compare service providers, ensuring that the project is completed to high standards and meets the specific needs of the property.
- Asphalt shingle roof installation services are needed when homeowners want to replace an aging or damaged roof, with local contractors carefully preparing the existing structure before installing new shingles. Roof replacement with asphalt shingles is suitable for those upgrading their home’s exterior, where local service providers follow a step-by-step process to ensure proper layering and alignment. New asphalt shingle roof construction is often sought for new builds or additions, with local pros handling the entire installation from deck preparation to final shingle placement. Roof repair involving asphalt shingles is necessary after storm damage or leaks, and local contractors assess the roof’s condition to determine the appropriate installation approach. Complete asphalt shingle roofing projects are ideal for homes needing a full overhaul, with local service providers managing each phase to ensure a durable, weather-resistant result.

When people search for the asphalt shingle roof installation process explained step by step, they often want to understand what the project involves from start to finish. Homeowners typically consider this topic when planning to replace an aging roof, repair damage caused by storms, or upgrade their property's curb appeal. It’s also relevant for those who want to learn about the different stages involved in installing a new roof, so they can better communicate with local contractors or make informed decisions. This process is connected to broader plans for home improvement, property maintenance, or preparing a house for sale, making it a common concern among homeowners seeking reliable, long-lasting roofing solutions.
The asphalt shingle roof installation process is closely related to common property issues such as leaks, structural damage, or deterioration due to weather exposure. Homeowners often explore this topic when considering a complete roof replacement or a new installation to improve durability and protection. It also ties into plans for upgrading a home’s exterior, increasing energy efficiency, or simply maintaining the property's value. Understanding the step-by-step process helps homeowners grasp what to expect during the project and how local service providers can assist in ensuring the work is done properly, efficiently, and with quality materials.
Properties that frequently come up in discussions about asphalt shingle roof installation include single-family homes, multi-family residences, and small commercial buildings. These structures often feature pitched roofs suitable for asphalt shingles, which are popular due to their affordability, versatility, and ease of installation. The process can vary slightly depending on the property’s size, roof complexity, and existing conditions, but the core steps remain consistent. Homeowners with these types of properties can benefit from knowing how local contractors approach each stage of the installation, from preparing the existing structure to final inspections, to ensure their project aligns with best practices.
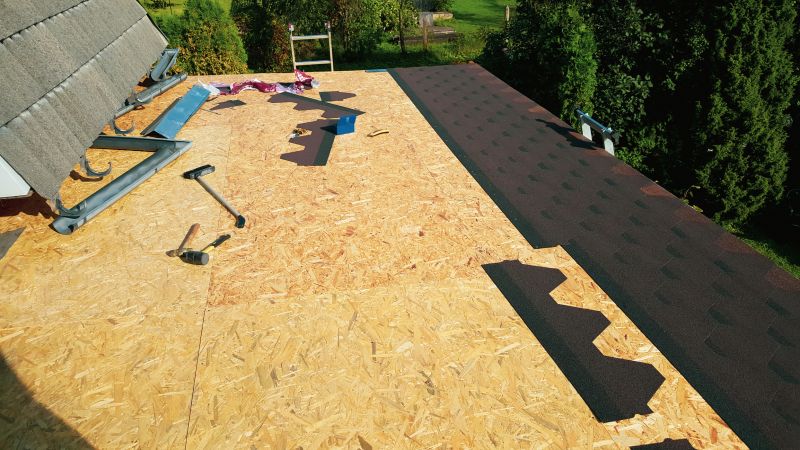
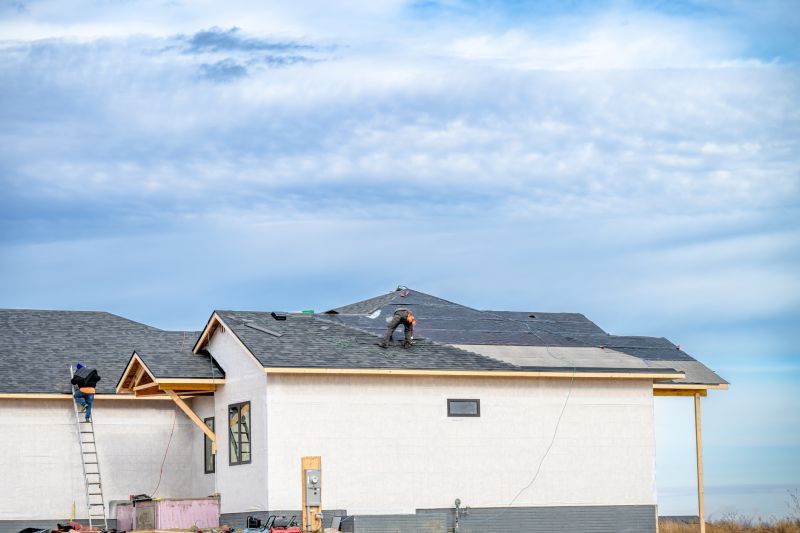
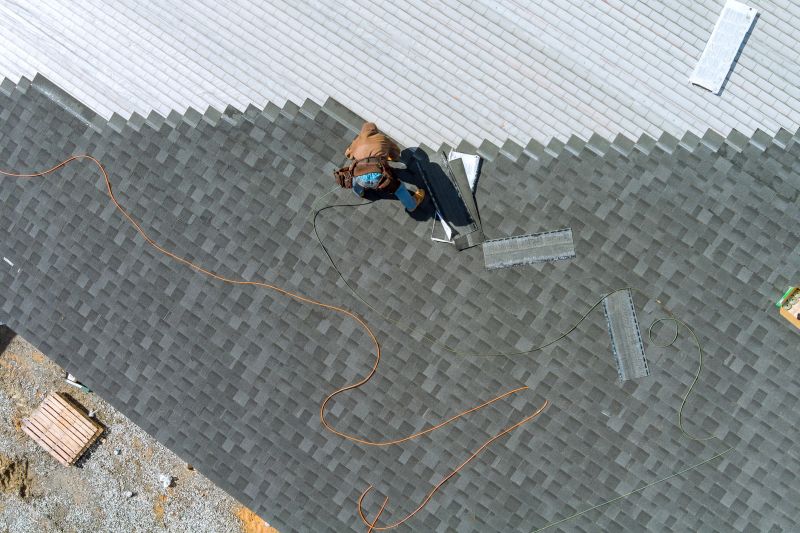
Understanding the asphalt shingle roof installation process explained step by step provides homeowners with a clearer picture of what to expect when working with local contractors. These service providers handle each phase, including removing old roofing materials, inspecting and repairing the underlying structure, installing new underlayment, and laying down the shingles themselves. Knowing how these steps connect to real projects helps property owners make better decisions about scheduling, material choices, and project scope. It also emphasizes the importance of choosing experienced local pros who can deliver quality work, ensuring the new roof provides lasting protection and enhances the property's appearance.
Roof repair projects - these involve assessing and fixing damaged roofing components, requiring similar planning, safety precautions, and skillful use of roofing tools as the asphalt shingle roof installation process explained step by step.
Gutter installation services - installing gutters alongside roofing projects demands precise measurements and understanding of roof structures, aligning with the planning and execution skills needed for asphalt shingle roof installation.
Attic insulation upgrades - improving attic insulation involves working in tight spaces and understanding roofing structures, which complements the knowledge required for proper shingle roof installation.
Siding replacement projects - replacing or repairing siding involves similar surface preparation and material handling skills as those used in asphalt shingle roof installation services.
Flashing and waterproofing work - installing or repairing flashing requires detailed planning and careful tool use, paralleling the process of installing asphalt shingles to ensure roof durability.
Roof ventilation system installation - setting up proper ventilation involves understanding roof structures and airflow principles, skills that are also essential in the asphalt shingle roof installation process explained step by step.
When evaluating local contractors for asphalt shingle roof installation services, it is important to consider their experience with similar projects. Homeowners should inquire about the types of roofing work they have completed and whether they have handled projects comparable in size and scope to their own. A contractor with a proven track record in asphalt shingle installations can offer insights into the process and help ensure that the project will be managed efficiently and effectively. Reputable references from previous clients can provide valuable perspectives on the quality of work and reliability of the service provider, giving homeowners confidence in their choice of a local contractor.
Clear written expectations are essential when comparing prospective service providers. Homeowners should seek detailed proposals that outline the scope of work, including the steps involved in the asphalt shingle roof installation process explained step by step. This clarity helps prevent misunderstandings and ensures that both parties are aligned on project milestones, materials used, and completion criteria. Well-documented expectations also serve as a reference throughout the project, making it easier to address any concerns or changes that may arise during the installation.
Effective communication is a key factor to consider when selecting a local contractor for asphalt shingle roof installation services. A contractor who maintains open, transparent, and timely communication can facilitate a smoother project experience. Homeowners should observe how promptly and clearly the service provider responds to inquiries, explains the installation process, and discusses potential issues. Good communication fosters trust and provides peace of mind, ensuring that homeowners stay informed and involved throughout the entire process while making well-informed decisions about their roofing project.
Property owners often search for the asphalt shingle roof installation process explained step by step when they are planning practical projects around their homes and businesses. Local pros provide Asphalt Shingle Roof Installation services for everyday jobs and straightforward project options.
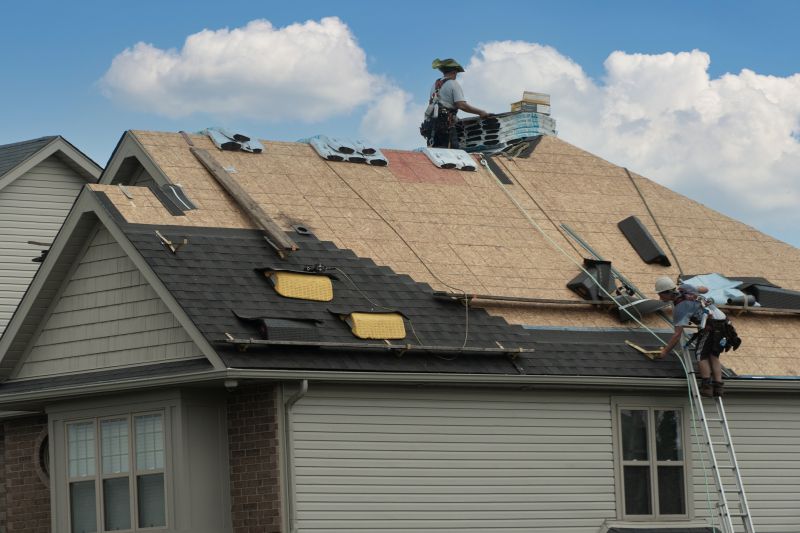
Homeowners in the area often look up information about the asphalt shingle roof installation process explained step by step to better understand what to expect when replacing or installing a new roof. Many property owners want to ensure their homes are protected and want to learn about the typical stages involved, such as preparing the roof deck, applying underlayment, and installing the shingles. Understanding this process can help them make informed decisions when choosing local contractors who specialize in asphalt shingle roof installations, ensuring the work is done properly and efficiently.
For those considering a roof replacement or new installation, knowing the general steps involved in the asphalt shingle roof installation process can provide peace of mind and clarity. Local contractors who handle these projects are well-versed in the typical sequence, from removing the old roofing material to inspecting the roof deck and applying the final layer of shingles. Property owners seeking reliable service providers can compare local options to find experienced professionals capable of managing each phase of the installation smoothly and effectively.
What are the main steps involved in the asphalt shingle roof installation process explained step by step? The process typically includes removing the old roofing, inspecting and preparing the roof deck, installing underlayment, laying down new asphalt shingles, and finishing with ridge caps and detailing. Local contractors can guide through each stage to ensure proper installation.
How do local contractors prepare a roof for asphalt shingle installation? They start by inspecting the existing roof for damage, cleaning the surface, repairing any issues, and installing a suitable underlayment to create a solid base for the new shingles.
What materials are used during the asphalt shingle roof installation process? Common materials include asphalt shingles, underlayment, flashing, nails, and ridge caps. Local service providers ensure the right materials are used for durability and performance.
What steps are involved in installing asphalt shingles during the process? Installation involves laying starter strips, applying shingles in overlapping rows, securing them with nails, and ensuring proper alignment and sealing to prevent leaks.
Why is it important to have a professional handle the asphalt shingle roof installation process explained step by step? Professionals ensure the installation follows proper procedures, which can improve the roof’s longevity, performance, and resistance to weather elements. Local contractors bring expertise to each phase of the process.
Understanding the roof preparation stage - property owners can learn how local contractors prepare the roof deck to ensure a solid foundation for asphalt shingles.
Selecting the right asphalt shingles - homeowners can explore different shingle styles and qualities with local service providers to match their property's aesthetic and durability needs.
Recognizing the installation steps - property owners can gain insight into how local pros lay and secure shingles, helping them understand the importance of proper installation techniques.
Knowing the final inspection process - homeowners can learn what to expect during the final check by local contractors to ensure the roof installation meets quality standards.
If you are thinking about the asphalt shingle roof installation process explained step by step for a property, this guide is meant to help you understand this topic, the typical project types, and how different options might fit your plans.
When you are ready, you can use the quote form on this page to share a few details about your project. From there, local pros can review the basics and follow up with options that match what you have in mind.